Stop Loss and Take Profit Placement: A Comprehensive Guide
Stop loss and take profit orders are foundational risk management tools that define your exit points before entering a trade. Poor placement transforms winning strategies into losing ones, while proper placement creates consistent, sustainable trading results.
On this page
Stop loss and take profit orders are the two exit points that define every trade before you enter it. A stop loss closes your position automatically when price moves against you. A take profit closes it when you hit your target. Simple concept, but most traders get the placement wrong — and that alone can turn a solid strategy into a money pit.
“The market can remain irrational longer than you can remain solvent.”
— John Maynard Keynes
Understanding Stop Loss Fundamentals
At its core, a stop loss tells your broker: "If price gets here, get me out." That predetermined level removes the emotion from loss management and puts a hard cap on what you can lose per trade.
But there's more to it than just limiting damage. A stop loss forces you to define your trade thesis before you click buy or sell. If price reaches your stop, your original analysis was wrong. Full stop. The position should close regardless of whether you feel hopeful or terrified. That discipline is what separates systematic traders from people who are essentially gambling.
You've got a few different order types to work with. A standard stop loss executes at market price once triggered, which guarantees you get out but not at any specific price. A stop limit sets a floor on your exit price but won't fill if the market gaps through it. A trailing stop moves with price as your trade goes in your favor, locking in gains while leaving room to run. And a time-based stop closes the position after a set period if your target hasn't been reached.
For most situations, a standard stop loss does the job. Trailing stops make more sense for trend-following strategies where you're trying to capture extended moves without a fixed target.
Stop Loss Placement Techniques
Good stop placement has one core tension: you need to go far enough that normal price noise doesn't shake you out, but close enough that a real reversal doesn't destroy your account. Finding that balance is the whole game.
Technical-Based Placement
The most reliable stops sit outside technical levels where price behavior actually changes.
Support and resistance levels are the obvious starting point. If you're buying at support, your stop goes below it — typically 5 to 20 pips beyond, depending on how volatile the asset is. That buffer accounts for false breaks and spread costs.
Moving averages work well in trending markets. For a long position, place your stop below the 20 or 50-period moving average. Price can touch these levels without closing below them and still continue trending. A close below is what matters, not an intraday poke.
For swing trading specifically, stops belong beyond the most recent swing point. In an uptrend, that means below the last swing low. You're respecting market structure while giving the trade room to breathe.
Volatility-Based Placement
Fixed pip stops are a trap. A 30-pip stop on EUR/USD might be perfectly reasonable on a quiet Tuesday but get run in the first 10 minutes of a volatile news day. The Average True Range (ATR) solves this.
Multiply the 14-period ATR by 1.5 to 2.5 and use that as your stop distance from entry. If ATR is 50 pips and you use a 2x multiplier, your stop sits 100 pips away. When markets get volatile, your stop automatically widens. When things calm down, it tightens. You're always calibrated to current conditions rather than some arbitrary number.
Bollinger Bands offer a similar approach. Stops go outside the bands, since price tends to revert toward the middle. During expansion phases the bands widen, which naturally gives your stop more room.
Percentage-Based Placement
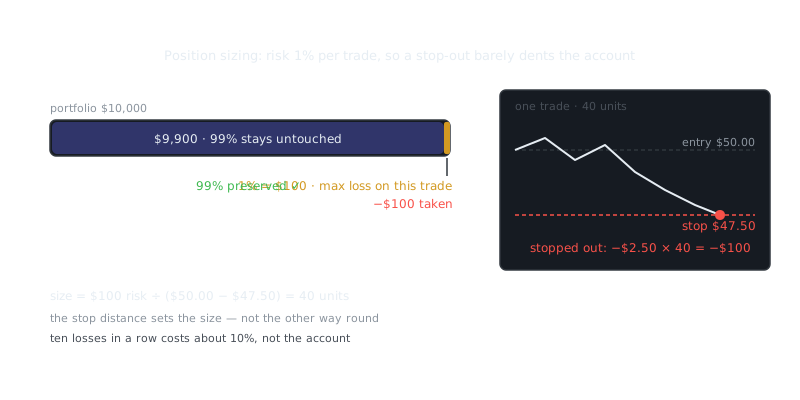
This approach starts with how much you're willing to lose rather than where price "should" go. Risk 1-2% of your capital per trade for a conservative approach, or up to 5% if you're running a more aggressive strategy.
The math is straightforward. On a $10,000 account risking 2%, you can lose $200 on any single trade. Your position size then flows from your stop distance:
Position Size = (Account Size × Risk %) / (Entry Price - Stop Price)
Buying a stock at $50 with a stop at $48 on a $10,000 account with 2% risk: Position Size = ($10,000 × 0.02) / ($50 - $48) = $200 / $2 = 100 shares
This way your stop placement and position size work together instead of being set independently.
Take Profit Strategies
Take profit orders solve a very human problem: we're bad at closing winning trades. Without a predefined exit, you'll either hold too long and watch profits vanish, or get nervous and exit way too early. Defining your target before entry takes that decision off the table when emotions are running highest.
Risk-Reward Ratio Approach
The simplest method ties your take profit directly to your stop distance. A 1:2 risk-reward ratio means if you're risking 50 pips, you're targeting 100. Here's why the math matters:
| Win Rate | Risk:Reward | Expected Return |
|---|---|---|
| 30% | 1:3 | 0% (break-even) |
| 40% | 1:2 | +20% |
| 50% | 1:1.5 | +25% |
| 60% | 1:1 | +20% |
A strategy that's right only 40% of the time can be profitable if the average winner is twice the average loser. That's not a motivational poster — it's arithmetic. Grid trading systems often run tighter 1:1 or 1:1.5 ratios with higher win rates, while trend-following approaches use 1:3 or wider and accept being wrong more often.
Technical Target Placement
Rather than projecting a target from your stop, you can anchor it to where price is likely to stall or reverse.
Previous highs and lows are the most reliable spots. These are levels where buyers or sellers previously overwhelmed the other side, and they tend to act as psychological barriers on the way back.
Fibonacci extensions — particularly the 1.618, 2.618, and 4.236 levels — project potential reversal zones based on previous swing structure. You calculate them from the start of a move through the retracement to get projected targets ahead.
For chart patterns like flags, triangles, or head and shoulders formations, measured moves give you a target. If a stock rallied $10 before consolidating into a flag, project $10 above the breakout point from that flag.
Partial Profit Taking
You don't have to exit everything at once. Taking 50% off at a 1:1.5 target, then moving your stop to breakeven and letting the rest run to 1:3 gives you the best of both worlds — you capture quick gains while staying in for the bigger move.
Watch volume as price approaches your target. Declining volume suggests the move is running out of steam. Strong volume often means continuation, which is a signal to hold rather than exit completely.
Adjusting Stops During the Trade
For short-term trades, a static stop is fine. Longer positions benefit from stops that move as the trade develops.
Trailing stops lock in gains as price advances. You can trail at 2x ATR, below a rising moving average, or using a fixed percentage — whatever fits your strategy. The goal is staying in the trade while protecting more and more of your unrealized profit.
Once a trade moves to roughly 1:1 reward-to-risk, moving your stop to breakeven makes sense. You can't lose money on the trade from that point. Yes, you might get stopped out at zero profit, but the worst case is now a scratch rather than a loss.
Time is also a factor worth watching. If a trade hasn't moved toward your target in the expected timeframe, that's information. Price chopping sideways suggests weak momentum and growing reversal risk. Tightening the stop or just exiting outright is often the right call.
One rule you should never break: don't move your stop away from current price to avoid being stopped out. That's not trade management — it's hoping. It violates your original analysis and quietly expands your risk beyond what you agreed to when you entered.
Integrating Stops Into a Trading System
Stop and take profit placement doesn't exist in isolation. It has to fit your backtested results, your timeframe, and the markets you're trading.
When you're testing a strategy, stop and target parameters are part of what you're optimizing. Running combinations systematically is the only way to find what actually works for your approach:
# Pseudocode for testing stop/target combinations
for stop_multiplier in [1.5, 2.0, 2.5]:
    for reward_multiplier in [2.0, 2.5, 3.0]:
        stop_distance = ATR * stop_multiplier
        target_distance = stop_distance * reward_multiplier

        # Run backtest with these parameters
        results = run_backtest(stop_distance, target_distance)

        # Track which combination yields best risk-adjusted returns
        if results.sharpe_ratio > best_sharpe:
            optimal_stop = stop_distance
            optimal_target = target_distance
Your timeframe shapes how wide your stops need to be. Day traders can use tighter stops — 0.5 to 1x ATR — because they're watching the screen and can react fast. Swing traders need 2 to 3x ATR to survive intraday noise that doesn't actually threaten the trade. Position traders sometimes use weekly ATR values entirely.
Market conditions matter too. During high-volatility periods like earnings announcements, major economic releases, or market dislocations, widening your stop prevents getting shaken out by erratic swings that don't reflect a real trend change. In calm, trending markets, tighter stops work just fine.
Common Mistakes and How to Avoid Them
Stops that are too tight are the most common error new traders make. Fear of losing drives people to place stops just beyond entry, where normal price movement will trigger them constantly. If you're getting stopped out on trade after trade before the market even has a chance to develop, this is almost certainly your problem. Use ATR.
Avoid placing stops at round numbers like $50.00 or 1.2000 in forex. These levels cluster orders from thousands of traders, creating obvious pools of liquidity that institutional players actively target. Moving your stop a few cents or pips away from round numbers costs you almost nothing and makes you much less predictable.
Account for spread and slippage. If your stop is 20 pips from entry but the spread on your instrument is 2 pips, your real risk is 22 pips. That gap adds up across hundreds of trades.
Every single position needs a stop. No exceptions. "High probability" setups fail regularly — that's just how markets work. Trading without a stop isn't a strategy, it's a slow account bleed waiting to happen.
Summary and Key Takeaways
Where you put your stops and targets determines whether a genuine edge in the market actually shows up in your account balance. Get this wrong and a profitable system becomes a losing one.
The principles that hold up across strategies and markets: stops need to account for actual volatility, not arbitrary values; they belong beyond significant technical levels to survive false breaks; risking 1-2% per trade keeps you in the game long enough for your edge to
Frequently Asked Questions
What is a stop loss and why do I need one?
A stop loss is an order that automatically closes your trade if the price moves against you by a set amount, limiting how much you can lose. Without one, a trade can keep moving in the wrong direction and wipe out a large portion of your account. It's one of the most important tools for protecting your capital as a beginner.
Where should I place my stop loss?
A common approach is to place your stop loss just beyond a key support or resistance level, so the market has to make a significant move to hit it. Avoid placing it too close to your entry, as normal price fluctuations can trigger it before the trade has a chance to work. A good rule of thumb is to base the placement on the chart structure, not on how much money you're willing to lose.
What is a take profit and how do I decide where to set it?
A take profit is an order that automatically closes your trade once the price reaches your target, locking in your gains. A simple way to set it is to aim for a reward that is at least twice your risk — so if your stop loss is 20 pips away, target at least 40 pips of profit. This risk-to-reward ratio helps you stay profitable even if you lose more trades than you win.
Video Resources
Sources & Further Reading
- CFTC: Learn & Protect — Regulator's plain-language warnings about leverage and fraud.
- Investopedia — Reference definitions and explainers for markets and trading.
- Investopedia: Technical Analysis — Indicator-by-indicator guides with worked examples.
- TradingView — Charting platform with community education and indicator scripts.
- CoinGecko — Price history, volume and market capitalisation data.
- BabyPips School — Free structured course on chart reading and risk management.
- Glassnode Academy — On-chain metrics explained, from active addresses to realised cap.